Search Tutorials

Sunday 29 September 2013

How to Send large Sms in Android

In this application, we will learn how to send Sms without getting any sending report. So create your new project and drop one button to XML file which will use to send Sms. Here we gave a simple example, you all can take mobile number and text message from edit text and send to particular user. The code of android XML file is given below:

<RelativeLayout xmlns:android="http://schemas.android.com/apk/res/android"
    xmlns:tools="http://schemas.android.com/tools"
    android:layout_width="match_parent"
    android:layout_height="match_parent">
    <Button
        android:id="@+id/button1"
        android:layout_width="wrap_content"
        android:layout_height="wrap_content"
        android:layout_alignParentLeft="true"
        android:layout_alignParentTop="true"
        android:layout_marginLeft="24dp"
        android:layout_marginTop="17dp"
        android:text="Send Message"
        android:onClick="msg" />
</RelativeLayout>

Now open you java file and use sendTextMessage() method to send sms. The code of android Java file is given below with explanation:

package selecom.alert; //your project name
import android.os.Bundle;
import android.telephony.SmsManager;
import android.view.View;
import android.app.Activity;

public class MainActivity extends Activity
    @Override
    protected void onCreate(Bundle savedInstanceState) {
        super.onCreate(savedInstanceState);
        setContentView(R.layout.activity_main);   
    }
//Called when we click on button
    public void msg(View v)
    {
//Get default sim services to send sms
      SmsManager sms=SmsManager.getDefault();
//Enter mobile number and text message
      sms.sendTextMessage("8527801400" ,null, "hello Mohsin i am using your App", null, null);
    }    
}


If your message is larger than 160 chars than the above method will not work. To send large message, we will have to divide large message into small messages and send to a particular person. 

             String str="your large message";
             String number="person mobile number";
             SmsManager smsManager = SmsManager.getDefault();
            ArrayList<String> parts = smsManager.divideMessage(str);
            smsManager.sendMultipartTextMessage(number, null, parts, null, null);

If you want to send a particular message to multiple people than simple use string array and for loop like this:
           
            String[] numbers={ "8527801400","8307489274"} //add more
            for(int i=0; i<numbers.length; i++)
            {
               smsManager.sendMultipartTextMessage(numbers[i], null, parts, null, null);
            }

Because we are using service of android phone in our application so we have to take permission to use it and i already discuss about Implicit Intent. The code of AndroidManifist.xml file is given below:

<?xml version="1.0" encoding="utf-8"?>
<manifest xmlns:android="http://schemas.android.com/apk/res/android"
    package="selecom.alert"
    android:versionCode="1"
    android:versionName="1.0" >
    <uses-sdk
        android:minSdkVersion="8"
        android:targetSdkVersion="10" />
    <uses-permission android:name="android.permission.SEND_SMS"/>
    <application
        android:allowBackup="true"
        android:icon="@drawable/ic_launcher"
        android:label="@string/app_name"
        android:theme="@style/AppTheme" >
        <activity
            android:name="selecom.alert.MainActivity"
            android:label="@string/app_name" >
            <intent-filter>
                <action android:name="android.intent.action.MAIN" />
                <category android:name="android.intent.category.LAUNCHER" />
            </intent-filter>
        </activity>
    </application>
</manifest>

Now run your project and test application. If you have any doubts please comment. Share and help others. Thanks... :)

Android Dialog Box Example

Android Dialog Box Example...
Open xml file and below code:

<RelativeLayout xmlns:android="http://schemas.android.com/apk/res/android"
    xmlns:tools="http://schemas.android.com/tools"
    android:layout_width="match_parent"
    android:layout_height="match_parent">
    <Button
        android:id="@+id/button1"
        android:layout_width="wrap_content"
        android:layout_height="wrap_content"
        android:layout_alignParentLeft="true"
        android:layout_alignParentTop="true"
        android:layout_marginLeft="24dp"
        android:layout_marginTop="17dp"
        android:text="CLOSE"
        android:onClick="close" />
</RelativeLayout>


Now open java file and paste below code

package selecom.alert;
import android.os.Bundle;
import android.app.Activity;
import android.app.AlertDialog;
import android.app.AlertDialog.Builder;
import android.app.Dialog;
import android.content.DialogInterface;
import android.view.View;
import android.widget.Toast;

public class MainActivity extends Activity {
    @Override
    protected void onCreate(Bundle savedInstanceState) {
        super.onCreate(savedInstanceState);
        setContentView(R.layout.activity_main);
     
    }
    public void close(View v)
    {
      onCreateDialog(10);
    }

protected Dialog onCreateDialog(int id)
{
      switch(id)
      {
      case 10:
            Builder builder=new AlertDialog.Builder(this);
            builder.setMessage("Activity will close!!!");
            builder.setTitle("Warning...");
            builder.setIcon(R.drawable.warning_image);
//button 
            builder.setNegativeButton("No", new DialogInterface.OnClickListener() {
                 
                  @Override
                  public void onClick(DialogInterface dialog, int which)
                  {
                        Toast.makeText(getApplicationContext(), "Nothing happened", Toast.LENGTH_LONG).show();
                       
                  }
            });
//button
      builder.setPositiveButton("yes", new DialogInterface.OnClickListener() {
                 
                  @Override
                  public void onClick(DialogInterface dialog, int which)
                  {
                        finish();
                       
                  }
            });
//button
      builder.setNeutralButton("Thinking", new DialogInterface.OnClickListener() {
           
            @Override
            public void onClick(DialogInterface dialog, int which)
            {
                  Toast.makeText(getApplicationContext(), "i have to think", Toast.LENGTH_LONG).show();
                 
            }
      });
           
      AlertDialog dialog=builder.create();
      dialog.show();
           
      }
      return super.onCreateDialog(id);
     
}
  
} 

We can use maximum three buttons in dialog box by default and builder is used to create dialog box. Sequence of the buttons to appear on box: positive, neutral than negative.

Android Table Layout visible and invisible colomn Example

Here, I have given android example of table layout in which we can hide, show or stretch any column. Open your main xml file and paste below code

<LinearLayout xmlns:android="http://schemas.android.com/apk/res/android"
    android:layout_width="fill_parent"
    android:layout_height="fill_parent"
    android:orientation="vertical" >

    <TableLayout
        android:id="@+id/tl"
        android:layout_width="match_parent"
        android:layout_height="wrap_content"
        android:stretchColumns="0,1,2">

        <TableRow
            android:id="@+id/tableRow1"
            android:layout_width="wrap_content"
            android:layout_height="wrap_content" >

            <Button
                android:id="@+id/button1"
                android:layout_width="wrap_content"
                android:layout_height="wrap_content"
                android:text="B1"
                android:onClick="gayab"/>

            <Button
                android:id="@+id/button2"
                android:layout_width="wrap_content"
                android:layout_height="wrap_content"
                android:text="B2"
                />

            <Button
                android:id="@+id/button3"
                android:layout_width="wrap_content"
                android:layout_height="wrap_content"
                android:text="B3" />

        </TableRow>
        <TableRow
            android:id="@+id/tableRow1"
            android:layout_width="wrap_content"
            android:layout_height="wrap_content" >
            <Button
                android:id="@+id/button5"
                android:layout_width="wrap_content"
                android:layout_height="wrap_content"
                android:text="B1"
                />

            <Button
                android:id="@+id/button6"
                android:layout_width="wrap_content"
                android:layout_height="wrap_content"
                android:text="B2"
                />

            <Button
                android:id="@+id/button7"
                android:layout_width="wrap_content"
                android:layout_height="wrap_content"
                android:text="B3" />

        </TableRow>


    </TableLayout>

    <Button
        android:id="@+id/button4"
        android:layout_width="wrap_content"
        android:layout_height="wrap_content"
        android:text="Gayab"
        android:onClick="gayab" />

</LinearLayout>

Now open your java file and paste below code

package selcom.testlay;//your package name

import android.os.Bundle;
import android.app.Activity;
import android.view.Menu;
import android.view.View;
import android.widget.Button;
import android.widget.TableLayout;

public class MainActivity extends Activity {
      TableLayout ll;
      Button b4;
     

    @Override
    protected void onCreate(Bundle savedInstanceState) {
        super.onCreate(savedInstanceState);
        setContentView(R.layout.activity_main);
        ll=(TableLayout)findViewById(R.id.tl);
        b4=(Button)findViewById(R.id.button4);
      
    }
    public void gayab(View v)
    {
//visible and invisible collumn
      ll.setColumnCollapsed(0, !ll.isColumnCollapsed(0));
      if(ll.isColumnCollapsed(0))
      {
            b4.setText("show");
      }
      else
      {
            b4.setText("Hide");
      }
     
    }   
}


Now run this android table layout example on your device and test.

Open another Activity in Android using Explicit intent

In this android application we will learn how to open another activity of our project. We will use Explicit intent to open another activity first we'll lean what is intent than what is explicit intent:

Intent:- Intent is an android service that gives us the facilities of accessing one activity from the other activity. Basically, There are two types of Intent:

1) Implicit Intent

2) Explicit Intent

Explicit Intent:- Accessing one user define activity from the other activity like open new page of the application.

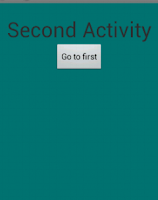
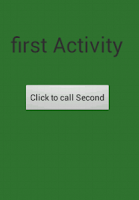
Here we are giving example of Implicit intent. So, create new project and drop one text view and one button. The code of android XML files is given below:

Open another Activity in Android using Explicit intentOpen another Activity in Android using Explicit intent

(Main XML file:- activity_main.xml)

<RelativeLayout xmlns:android="http://schemas.android.com/apk/res/android"
  xmlns:tools="http://schemas.android.com/tools"
  android:layout_width="match_parent"
  android:layout_height="match_parent"
  android:background="#373">
<TextView
  android:id="@+id/textView1"
  android:layout_width="wrap_content"
  android:layout_height="wrap_content"
  android:layout_alignParentTop="true"
  android:layout_centerHorizontal="true"
  android:layout_marginTop="50dp"
  android:text="first Activity"
  android:textSize="35sp" />
<Button
  android:id="@+id/button1"
  android:layout_width="wrap_content"
  android:layout_height="wrap_content"
  android:layout_below="@+id/textView1"
  android:layout_centerHorizontal="true"
  android:layout_marginTop="42dp"
  android:onClick="call"
  android:text="Click to call Second" />
</RelativeLayout>

(Second XML file:- second.xml)

<?xml version="1.0" encoding="utf-8"?>
<LinearLayout xmlns:android="http://schemas.android.com/apk/res/android"
  android:layout_width="match_parent"
  android:layout_height="match_parent"
  android:orientation="vertical"
  android:background="#077">
<TextView
  android:id="@+id/textView1"
  android:layout_width="wrap_content"
  android:layout_height="wrap_content"
  android:text="Second Activity"
  android:layout_marginTop="20dp"
  android:layout_marginLeft="30dp"
  android:textSize="35sp" />
<Button
  android:id="@+id/button1"
  android:layout_width="wrap_content"
  android:layout_height="wrap_content"
  android:onClick="call"
  android:layout_marginLeft="110dp"
  android:text="Go to first" />
</LinearLayout>

Now open Java file and initialize all objects. Use the following trick to use explicit intent:
Intent obj=new Intent(From,To);
The code of both android Java files is given below with description:

(Main Java file:- MainActivity.java)

package sel.expli; //you package name
import android.os.Bundle;
import android.view.View;
import android.app.Activity;
import android.content.Intent;
public class MainActivity extends Activity {
@Override
protected void onCreate(Bundle savedInstanceState) {
  super.onCreate(savedInstanceState);
  //set layout
  setContentView(R.layout.activity_main);
  }
  //This method is called when we click on button
  //and it is declare in main XML file in button tag
  //we have to pass View object in this method
  public void call(View v)
  {
  //define in intent where you want to go
  //use Intent(From,To) like we are sending a post
  Intent i=new Intent(this, SecondActivity.class);
  //start the given action to Intent
  startActivity(i);
  //finish this activity
  finish();
  }
}

(Second Java file:- SecondActivity.java)

package sel.expli; //you package name
import android.os.Bundle;
import android.view.View;
import android.app.Activity;
import android.content.Intent;

public class SecondActivity extends Activity {
@Override
protected void onCreate(Bundle savedInstanceState) {
  super.onCreate(savedInstanceState);
  //set layout
  setContentView(R.layout.second);
  }
  //See the explanation of main activity
  //both are same
  public void call(View v)
  {
  Intent i=new Intent(this, MainActivity.class);
  startActivity(i);
  finish();
  }
}

Now update AndroidManifist.xml file to use another activity in your project. Use the code below </activity> tag:


<activity android:name="sel.expli.SecondActivity" 
android:label="@string/app_name">
</activity>

Here sel.expli is your package name and SecondActivity (SeconActivity.java) is your second activity name.
Intent-filter in Android XML file is used to define which activity will launch first. Now run your project and test application. If you have any doubt please comment.

Related Tutorials:-

Make any column invisible in Table layout

Create a Dialog box

Send SMS without any Report

Create List and perform Actions on it

Create Auto Complete Text
Back to Top