Search Tutorials

Monday 11 November 2013

Display Time using Broadcast Receiver in Android

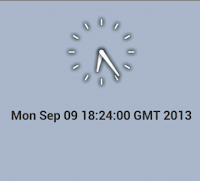
In this application, we will learn how to use broadcast services and how to perform action in every minute. We used one analog clock and one text view to display time. Create a new project, open XML file and drop one analog clock and one text view in relative layout. The code of android XML file is given below:

Display time using Broadcast receiver in Android
Broadcast Receiver Android Example

<?xml version="1.0" encoding="utf-8"?>
<RelativeLayout xmlns:android="http://schemas.android.com/apk/res/android"
  android:layout_width="fill_parent"
  android:layout_height="fill_parent"
  android:orientation="vertical"
  android:background="#abc" >
<AnalogClock
  android:id="@+id/analogClock1"
  android:layout_width="wrap_content"
  android:layout_height="wrap_content"
  android:layout_alignTop="@+id/textfield"
  android:layout_centerHorizontal="true"
  android:layout_marginTop="24dp" />
<TextView
  android:id="@+id/textView1"
  android:layout_width="wrap_content"
  android:layout_height="wrap_content"
  android:layout_below="@+id/analogClock1"
  android:layout_centerHorizontal="true"
  android:layout_marginTop="30dp"
  android:textStyle="bold"
  android:textSize="25sp"
  android:text="Current time is processing ...." />
</RelativeLayout>

Now open your Java file and use broadcast class just like in the previous example but here we are registering broadcast object with time tick intent filter which will be used to get updates every minute. The code is almost similar to the previous example except for the code in onReceive() method. First onCreate() method will be called, then after one minute onReceive() method will be called which will display time on Toast and Textview and this method will be called every minute. The code of the android Java file is given below:

package com.example.check_out_time; // Your Package name
import java.util.Calendar;
import android.app.Activity;
import android.content.BroadcastReceiver;
import android.content.Context;
import android.content.Intent;
import android.content.IntentFilter;
import android.os.Bundle;
import android.widget.TextView;
import android.widget.Toast;

public class MainActivity extends Activity {
  Context context=null;
  //broadcast class is used as nested class
  private BroadcastReceiver mtimeInfoReceiver = new BroadcastReceiver(){
  @Override
  public void onReceive(Context c, Intent i) {
  //initialize objects
  TextView textv=(TextView)findViewById(R.id.textView1);
  Calendar calendar=Calendar.getInstance();
  //display time on toast
  Toast.makeText(getApplicationContext(), "current time is--- :-"+calendar.getTime(), Toast.LENGTH_LONG).show();
  //set time on text view
  textv.setText(""+calendar.getTime());
  }
 };
  /** Called when the activity is first created. */
  @Override
  public void onCreate(Bundle savedInstanceState) {
  super.onCreate(savedInstanceState);
  setContentView(R.layout.activity_main);
  //use action time tick for getting update every minute
  IntentFilter mTime = new IntentFilter(Intent.ACTION_TIME_TICK);
  //register broadcast receiver
  registerReceiver(mtimeInfoReceiver, mTime);
  }
} 

Now run your project and test application. If you have any doubts, please comment. Share and help others.

Related Tutorials:-

Convert Text to Speech

Use Shared Preferences

Perform action on any Hardware button

Get all mobile Contacts

Get Battery level using Broadcast Receiver
Display Battery Status using Broadcast Receiver in Android

This is simple example of Android Broadcast Receiver. In this android project, we will learn how to use broadcast receiver and how to get the battery level and display it on the progress bar. We used one text view to display battery status and one progress bar to display battery level in progress. Create a new project, Open an XML file and use text view and progress bar in a linear layout. The code of the Android XML file is given below:

Display Battery level using Broadcast Receiver in Android
Check Battery level using Broadcast Receiver

<LinearLayout xmlns:android="http://schemas.android.com/apk/res/android"
  android:layout_width="fill_parent"
  android:layout_height="fill_parent"
  android:orientation="vertical"
  android:background="#abc" >
<TextView
  android:id="@+id/textView1"
  android:layout_width="wrap_content"
  android:layout_height="wrap_content"
  android:text=""
  android:textSize="25sp"
  android:layout_gravity="center"
/>
<ProgressBar
  android:id="@+id/progressBar1"
  style="?android:attr/progressBarStyleHorizontal"
  android:layout_width="wrap_content"
  android:layout_height="wrap_content"
  android:layout_gravity="center"
  android:minHeight="100dp"
  android:minWidth="200dp" />
</LinearLayout>

Now open your Java file, initialize broadcast object and use broadcast class as a nested class. Here, we are registering a broadcast object with a battery changed intent filter which will receive updates on every level of the battery changed. Whenever the battery level changes, onReceive() method will be called, which will take two parameters. Use the code in onReceive() method to do whatever is required to be done on every level of battery change. We are setting a level on progress bar, displaying level on text view and whenever battery level becomes 100% then a song, stored in the assets folder, will start playing. The code of the Android Java file is given below with explanation:


package com.exampl.aaaa; //your package name
import java.io.IOException;
import android.media.MediaPlayer;
import android.os.Bundle;
import android.app.Activity;
import android.content.BroadcastReceiver;
import android.content.Context;
import android.content.Intent;
import android.content.IntentFilter;
import android.content.res.AssetFileDescriptor;
import android.widget.ProgressBar;
import android.widget.TextView;

public class MainActivity extends Activity {
  //broadcast class is used as a nested class
  private BroadcastReceiver mbcr=new BroadcastReceiver()
  {
  //onReceive method will receive updates
  public void onReceive(Context c, Intent i)
  {
  //initially level has 0 value
  //after getting update from broadcast receiver
  //it will change and give battery status
  int level=i.getIntExtra("level", 0);
  //initialize all objects
  ProgressBar pb=(ProgressBar)findViewById(R.id.progressBar1);
  TextView tv=(TextView)findViewById(R.id.textView1);
  //set level of progress bar
  pb.setProgress(level);
  //display level on text view
  tv.setText("Batterylevel:"+Integer.toString(level)+"%");
  //start a song when the battery level touches 100%
  if(level==100)
  {
   try
   {
   //Save small.mp4 in assets folder
  //we can not start a media file from the drawable folder directly in broadcast method
   //hence we used the assets folder
   AssetFileDescriptor afd=getAssets().openFd("small.mp4");
   MediaPlayer mp=new MediaPlayer();
   //set file and starting point and ending point in bytes
   mp.setDataSource(afd.getFileDescriptor(), afd.getStartOffset(), afd.getLength());
   mp.prepare();
   //start song
   mp.start();
    }
    catch(IOException e){}
   }
  }
};
  /** Called when the activity is first created. */
  @Override
  protected void onCreate(Bundle savedInstanceState) {
   super.onCreate(savedInstanceState);
   //set layout
   setContentView(R.layout.activity_main);
   //register broadcast receiver
   //Get battery changed status
   //we can get more options like power connect, disconnect, call, etc.
   //To get more options, write Intent followed by a dot(.) and press CTRL+Space
   //you will get all the options
   registerReceiver(mbcr,new IntentFilter(Intent.ACTION_BATTERY_CHANGED));
  }
}
  

Now run your project and test application. If you have any doubts please comment. Share and help others.

Related Tutorials:-

Convert Text to Speech

Use Shared Preferences

Perform action on any Hardware button

Get all Mobile Contacts

Display Time using Broadcast Receiver

Display all Mobile Contacts in Android

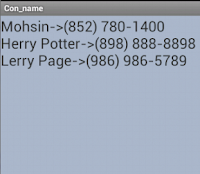
In this application, we will learn how to read mobile contacts and display all the contacts on text view. We used a text view in scroll view to display all the contacts with their names. Create a new project, open the XML file and drop text view in scroll view layout. The code of android XML file is given below:

Display all Mobile Contacts in Android

<LinearLayout xmlns:android="http://schemas.android.com/apk/res/android"
  xmlns:tools="http://schemas.android.com/tools"
  android:layout_width="match_parent"
  android:layout_height="match_parent"
  android:background="#abc">
<ScrollView
  android:id="@+id/scrollView1"
  android:layout_width="wrap_content"
  android:layout_height="match_parent" >
<TextView
  android:id="@+id/text1"
  android:layout_width="wrap_content"
  android:layout_height="wrap_content"
  android:textSize="25sp"
  android:text="" />
</ScrollView>
</LinearLayout>

Now open your Java file and paste the code below. To get all your phone contacts, use a cursor object because it can keep a variable of any datatype. A cursor is mostly used in databases like SQLite in a select query or during the fetching of data from a table which has different types of variables, etc. Use moveToNext() method in the while loop to get row one by one from the cursor, use getString() method to get the data one by one from a row and use getColumnIndex() method to get column index using index value. The code of the android Java file is given below with explanation:

package sel.con_name; //your package name

import android.os.Bundle;
import android.provider.ContactsContract;
import android.widget.TextView;
import android.app.Activity;
import android.database.Cursor;

public class MainActivity extends Activity {
  TextView tv;
  @Override
  protected void onCreate(Bundle savedInstanceState)
  {
  super.onCreate(savedInstanceState);
  setContentView(R.layout.activity_main);
  tv=(TextView)findViewById(R.id.text1);
  //use cursor to keep any type of data
  //take all mobile contacts database in cursor
  Cursor phones = getContentResolver().query(ContactsContract.CommonDataKinds.
Phone.CONTENT_URI, null,null,null, null);
  while (phones.moveToNext())
  {
    //get name and number from cursor using column index
    String name=phones.getString(phones.getColumnIndex(
ContactsContract.CommonDataKinds.Phone.DISPLAY_NAME));
    String phoneNumber = phones.getString(phones.getColumnIndex(
ContactsContract.CommonDataKinds.Phone.NUMBER));
    //display on text view
    tv.append(name+"->"+phoneNumber+"\n");
   }
  phones.close();
  }
}

Now open your AndroidManifest.xml file and give permission to read contacts from mobile. The code of the AndroidManifest.xml file is given below:

<?xml version="1.0" encoding="utf-8"?>
<manifest xmlns:android="http://schemas.android.com/apk/res/android"
  package="sel.con_name"
  android:versionCode="1"
  android:versionName="1.0" >
<uses-sdk
  android:minSdkVersion="10"
  android:targetSdkVersion="10" />
<uses-permission android:name="android.permission.READ_CONTACTS"/>
<application
  android:allowBackup="true"
  android:icon="@drawable/ic_launcher"
  android:label="@string/app_name"
  android:theme="@style/AppTheme" >
<activity
  android:name="sel.con_name.MainActivity"
  android:label="@string/app_name" >
<intent-filter>
<action android:name="android.intent.action.MAIN" />
<category android:name="android.intent.category.LAUNCHER" />
</intent-filter>
</activity>
</application>
</manifest>

Now run your project and test the application. If you have any doubts please comment. Share and help all developers.

Related Tutorials:-

Get battery level using Broadcast Receiver

Display Time using Broadcast Receiver

Warning: No DNS servers found in Android Eclipse

Extract APK File into source code (Java code and XML code)

Run two or more instances of emulator at a time

Perform Action on Hardware Buttons in Android

In this application, we will learn how to perform action when we click on any hardware button, for example menu button, home button, any numbers, power button, etc. Here we are giving a simple android code example of a menu button; we created a custom menu which is initially invisible. It becomes visible when we click on the menu button. We used many buttons in horizontal scroll view, placed at the bottom of the parent layout. We can create a simple example also. For instance, we could display the hardware code on text view whenever we click on any hardware button. To understand how it is done, create a new project and use the XML code given below in your main android XML file:

Perform Action on any Hardware Button in Android

 <?xml version="1.0" encoding="utf-8"?>
<HorizontalScrollView xmlns:android="http://schemas.android.com/apk/r/android"
  android:id="@+id/horizontalScrollView1"
  android:layout_width="wrap_content"
  android:layout_height="wrap_content"
  android:scrollbars="none"
  android:layout_gravity="bottom"
  android:visibility="invisible">
<LinearLayout
  android:id="@+id/linearLayout1"
  android:layout_width="match_parent"
  android:layout_height="match_parent"
  android:orientation="horizontal"
>
<Button
  android:id="@+id/one"
  android:layout_width="80dp"
  android:layout_height="56dp"
  android:text="One"
  android:textColor="#fff"
  android:background="#555"
  android:textSize="18sp"/>
<Button
  android:id="@+id/two"
  android:layout_width="80dp"
  android:layout_height="56dp"
  android:text="Two"
  android:textColor="#fff"
  android:background="#777"
  android:textSize="18sp"/>
<Button
  android:id="@+id/three"
  android:layout_width="80dp"
  android:layout_height="56dp"
  android:text="Three"
  android:textColor="#fff"
  android:background="#555"
  android:textSize="18sp"/>
<Button
  android:id="@+id/four"
  android:layout_width="80dp"
  android:layout_height="56dp"
  android:text="Four"
  android:textColor="#fff"
  android:background="#777"
  android:textSize="18sp"/>
<Button
  android:id="@+id/five"
  android:layout_width="80dp"
  android:layout_height="56dp"
  android:text="Five"
  android:textColor="#fff"
  android:background="#555"
  android:textSize="18sp"/>
<Button
  android:id="@+id/six"
  android:layout_width="80dp"
  android:layout_height="56dp"
  android:text="Six"
  android:textColor="#fff"
  android:background="#777"
  android:textSize="18sp"/>
<Button
  android:id="@+id/seven"
  android:layout_width="80dp"
  android:layout_height="56dp"
  android:text="Seven"
  android:textColor="#fff"
  android:background="#555"
  android:textSize="18sp"/>
</LinearLayout>
</HorizontalScrollView>

Now open your Java file and use the code below. To enable action on the click of a hardware button, onKeyDown is a method which is invoked whenever we click on any hardware button. This method overrides the original method and it is invoked first. We can display every code of the hardware button which is clicked by user by simply displaying the keycode value in a given method before the 'if' condition. The code of the android Java file is given below with explanation:


package selecom.smarty; // your package name 
import android.app.Activity;
import android.os.Bundle;
import android.view.KeyEvent;
import android.widget.HorizontalScrollView;

public class SmartyActivity extends Activity {
  /** Called when the activity is first created. */
  @Override
  public void onCreate(Bundle savedInstanceState) {
  super.onCreate(savedInstanceState);
  setContentView(R.layout.main);
  }
  //The onKeyDown method is Called when any hardware button is clicked
  //This method takes two parameters, first hardware button code
  //Which is clicked and key event object which will have all
  //hardware button codes
  public boolean onKeyDown(int keycode, KeyEvent event)
  {
   //if clicked button code is equal to menu button code
   //then the if condition will turn true
   //To perform action on another button just write keyEvent
   //followed by dot(.) and press CTRL+Space and you will get all
   //the code options. Select anyone and perform your action.
   if(keycode==KeyEvent.KEYCODE_MENU)
   {
    HorizontalScrollView h=(HorizontalScrollView)findViewById(R.id.horizontalScrollView1);
     h.setVisibility(1);
    }
   return super.onKeyDown(keycode, event);
  }
}

Now run your project and test application. If you have any doubts please comment. Share and help all android developers.

Related Tutorials:-

Enable and Disable WiFi

Enable and Disable Bluetooth

Get Latitude and Longitude of the current Location

Use Sensor | Motion detection

Convert Text to Speech

Use Shared Preferences
Back to Top